How To Build the MG42 / M53 / MG3 From a Parts Kit in Semi-Auto

MG42 in use by German soldier during WWII
Hi all, it has been very busy for me over the last few months, so I haven’t had the opportunity to finish up this write up of the Zastava M53 build like I wanted to several months ago. This written guide will act as a companion to my build video documentation. I will go into much more detail in this article on how I accomplished this build and the specific challenges I faced. In this tutorial, you all will learn how to build a semi-automatic version of the MG42 and the differences and details of the different variants. I want to show the most simplistic way of completing this build without the use of specialized tools or jigs. The main tools needed for this build is a gas MIG welder, angle grinder, dremel, and of course a set of basic tools such as hammers, punches, vises etc.I should note here that I will not be installing new rails. I will use the original cut rails that are riveted in the kit without removing them. I do not see a reason to remove them in a semi automatic build, and honestly, new rails are a pain in the ass to install and it is much easier to do this build welding the receiver up with the originals in place.
To start this article off, let’s compare the differences between the major three variants, the MG42, M53 and the MG3.

Serbian service member with his M53
Fact of the matter is, functionally speaking, there is no difference between the MG42, MG3 and M53. They all use the same open bolt, recoil-operated, roller-locked design. When a round is fired, the recoil moves the barrel backwards, forcing the bolt to hit a cam that pushes the rollers in. The bolt then fully recoils back into the receiver and the barrel is pushed forward by a recuperator back into its original position. The Zastava M53 is an almost identical clone of the MG42 as Yugoslavia acquired the original technical drawings and blueprints of the MG42 from the Soviet Union, after the Soviets captured the documents at the end of World War II. The Soviets also captured and gave Yugoslavia the original machinery used to make the MG42, so most of the parts and features are indistinguishable between the two.

Anti-aircraft sight attached to the anti-aircraft mounting bracket
The most visible change on the M53 is the removal of the anti-aircraft front mounting bracket. The M53 shroud has the recess stamped into the shroud for the bracket but they never manufactured the bracket for use on the production models. The technical differences between the two are minor, the M53 has a different thread pitch on the buffer where the stock installs onto, and as such, stocks won’t interchange between the two. Zastava also slightly redesigned the grips, using a different type of plastic that was readily available to them, and the grip panels do not interchange as the mounting holes are in a different location. The M53 also has a heavier bolt and spring to slow down the rate of fire. The M53 also uses a rivet instead of a screw to hold the barrel latch in place.
It is hard to tell the difference be tween the M53 and MG42 unless you look really close at markings and whether or not the AA bracket is in place. RTG does make reproductions of the anti-aircraft mounting bracket for those that want to make an MG42 clone out of the M53, and if you wanted to be autistically correct you would also have to source some waffen marked parts like the top-cover, which can be expensive. The MG3, on the other hand, is much more visibly different than the mg42 in looks.

Rheinmetall MG 3
In 1955, West Germany joined NATO, but continued to use old MG42 machine guns chambered in 8mm Mauser. In order to meet standardization requirements, they began seeking a new design to utilize the standardized 7.62 NATO carriages. Ironically enough, the Germans did not even have the original MG42 design documents and blueprints, as they had all been captured by the Soviets. This twist of fate forced Rheinmetall to reverse engineer their own surplus MG42s in order to re-engineer a new machine gun for use in the Bundeswehr. Rheinmetall began development of the MG1 as the replacement, which featured a new top cover, feed tray, and barrel to accommodate for the new caliber. It proved to be more economical to re-purpose old MG42 rifles, and just re-chamber them in 7.62 NATO. By 1958, these re-purposed rifles were designated as the MG2, and by 1959, Rheinmetall began new production of the 7.62 NATO machine guns, designated as the MG3. The MG3 continues to be produced today and remains the primary issue machine gun of the Bundeswehr, as well as the primary issue machine gun of many other NATO countries.

MG3 in use during a training exercise by an Estonian military member.
The primary differences between the MG3 and the original MG42 mainly have to do with their conversion to 7.62 NATO. The top cover and feed tray are redesigned to feed 7.62×51, the feed tray has a latch that allows the installation of a drum to hold belts in place and aid in feeding the belts into the tray, the barrel is chambered in 7.62×51, and a newly designed booster cone is installed to allow more back-pressure to cycle the firearm. Other changes include moving the anti-aircraft sight to mount to the rear sight and is a standard issue part of the firearm as opposed to an add-on, and the recuperator extends all the way to the buffer block instead of retaining against the recuperator tab like the originals. Since the recuperator tab is no longer present, the trigger group pistol grip mounting bracket is a separate piece that rivets onto the bottom of the receiver, as opposed to being integrated with the recuperator stop tab. There are also visible differences in manufacturing techniques, for example, on the MG3, the cuts are all perfectly square, sharp, and concentric thanks to modern CNC machining, as opposed to the more crude production look of the originals.

demilled M53 kit with receiver sections
Now, due to easy availability of 308 and 7.62×51 in the United States, the MG3 is a popular option for builds, however there are no parts kits on the market with intact receivers. Most of the MG3 kits that came in had crushed receiver sections, however, the internal parts were salvageable and there are multiple online retailers that sell the MG3 parts. The MG42 and the M53 can be converted to shoot 308 / 7.62×51 by simply using the conversion parts from the MG3 parts kits. Using an MG3 top cover, feed tray, barrel, and booster cone will allow any of the M53 / MG42 parts kits to shoot 308. Most of the complete kits in the US are Zastava M53 parts kits, some of which were imported without the mid receiver sections, however, there are kits available that have all the original receiver sections. For this build, we will be using a parts kit that has all of the receiver sections and will be re-welding them into a complete semi-automatic receiver. The other option is to use 80% receiver shells but those are quite a bit more difficult to work with, and usually require some machine work. It should also be noted that the receiver shell clamps on the market are out of spec and require a lot of fitting to work correctly.

cut mg3 front section
ATF de-mill specifications for the MG42 call for the front section of the shroud to be cut through the front barrel trunnion / bushing. This makes repairing the front section very difficult if not possible at all, especially if you have limited tooling. This is where the parted out crushed MG3 kits come in handy. There are currently MG3 front sections readily available that are cut from the crushed receivers that have an intact barrel trunnion section welded in. It should be noted that the style / look is very slightly different from the MG42 / M53 due to the modern manufacturing methods developed by Germany, but if this does not bother your autism, it’s a real lifesaver and makes the re-weld much easier. The alternative would be to cut out the old bushing, buy a new manufactured one and weld it into the front section using the old receiver sections, and bridge the gap made during the torch cut. This would probably end up with a slightly different look than the originals anyway due to the welding and blending you had to do.

BRP semi auto matic grip-stick, recoil spring, and bolt carrier.
In order to stay compliant with that wonderful piece of legislation known as the National Firearms Act, we must build this as a semi-automatic firearm. To accomplish this, we will be using the BRP semi automatic grip stick and their bolt carrier group assembly. BRP has conveniently done all the hard work and machine work for us with these products. The semi-auto grip stick comes with an AR-15 trigger group pre-installed and MG42 grips modified to fit on the assembly. Their bolt carrier group is designed to work in conjunction with this grip assembly and requires a custom recoil spring to operate the firearm reliably. The semi-automatic version does not need a return spring nearly as heavy as the originals as this will be a closed bolt conversion. It should be noted that the complete grip sticks they have do look a little different than the originals but there’s really no getting around that as the front section has to be extended to accommodate the AR-15 trigger group. BRP also sells AR-15 trigger boxes that contain a trigger assembly and has the forward retaining tabs for those that wish to cut their original grip sticks and weld in the trigger box themselves.
 The next part you will need is the cuck bar. The cuck bar is used to cuck you out of installing an original full auto bolt carrier into the receiver, as it would require you to cut the sear down on the original bolt carrier to insert, and thus preventing the bolt carrier from engaging the sear in the original grip stick. The blocking bar is welded in place under the grip stick mounting bracket, and honestly the whole thing is a pain in the ass and really does make the whole build a little harder but it is required. Besides the blocking bar, the receiver itself will need to be cut in order to prevent the full auto grip stick from being installed on the firearm. This is done by cutting out the pistol grip area to disallow the front tabs on the original grip stick from locking into the receiver. This modification also needs to be done in order to allow clearance for the AR-15 hammer and the hammer spring. We will be covering how to install all these parts and perform these modifications in the later part of this tutorial.

mg42 recuperator diagram
After fully de-slagging the kit, removing all the burs and making sure each cut receiver section is clean, the first thing we will want to do is align the two mid sections of the receiver. This can easily be done by using the recuperator and the original grip stick, as the spacing between the two pieces can be determined by installing these two components. The first part to install is the recuperator, which sits under the left rail and retains in place with two screws, one in the rear and one L shaped one in the front. Before we install the recuperator, we will want to assemble it together. There is a screw, nut, plunger, spring, and the pusher itself. It is important to install the L shaped screw in the right way.

front recuperator nut screwed into place
You can see the installation of these parts from 5:25-6:14 in my build video. It should be noted that later we will need to modify the recuperator to fit around the blocking bar but for now we can just insert it into the front receiver section and screw it in place with the nut. Once we have the front of the recuperator screwed into place we can insert the rear section and slide the recuperator under the left rail. There is a hole on the receiver that the rear of the recuperator screws into. If your recuperator was original to your kit, you will see where the screw was pressed in against the cut out, and you can get a good idea where to insert the rear screw into and bolt it in place to get the original spacing. You can also do this the other way around and first screw the recuperator in the rear section and then install the front section and screw it in place like how I did in the video.
 The next step will be to install the original trigger group pistol grip assembly. inserting it is pretty straight forward, you just put the front tabs into the front section of the pistol grip cut out and then push it downwards into the mounting bracket. A retaining pin is used to keep it in place in the mounting bracket. This will keep the two sections nicely aligned. You can check alignment by inserting the bolt into the receiver from the rear. There will still be a little play in the sections but we can use the bolt as a guide to ensure that the sections are properly aligned when we tack weld the two parts together.

tack welding the mid section
The next step will be to start on the tack welds. You will want to clamp the receiver section down in a vise to keep the receiver from warping or shrinking during welding. Fact of the matter is there is really nothing you can do to prevent warping or shrinking, but you’ll want to minimize it as much as possible. Fortunately, you can get away with a lot of slop with the MG42, as long as everything is approximately within dimension you should be fine. Basically, if the bolt rides free and the parts align, you should be good to go. Once you get a couple tack welds in place, make sure the bolt does not bind when you move it back and forth. If it does, try and find where it’s binding and cut the tack weld that seem to be misaligned. Compress the receiver in whichever way allows free movement of the bolt and then re-tack it. Once all four tack welds are done, ensure the bolt rides freely and you should be good to go. At this point you can remove the recuperator and the pistol grip and you can rest assured that you have good alignment on the mid section. It feels good to have that section ready, but honestly, that is the easiest part to align in this build.
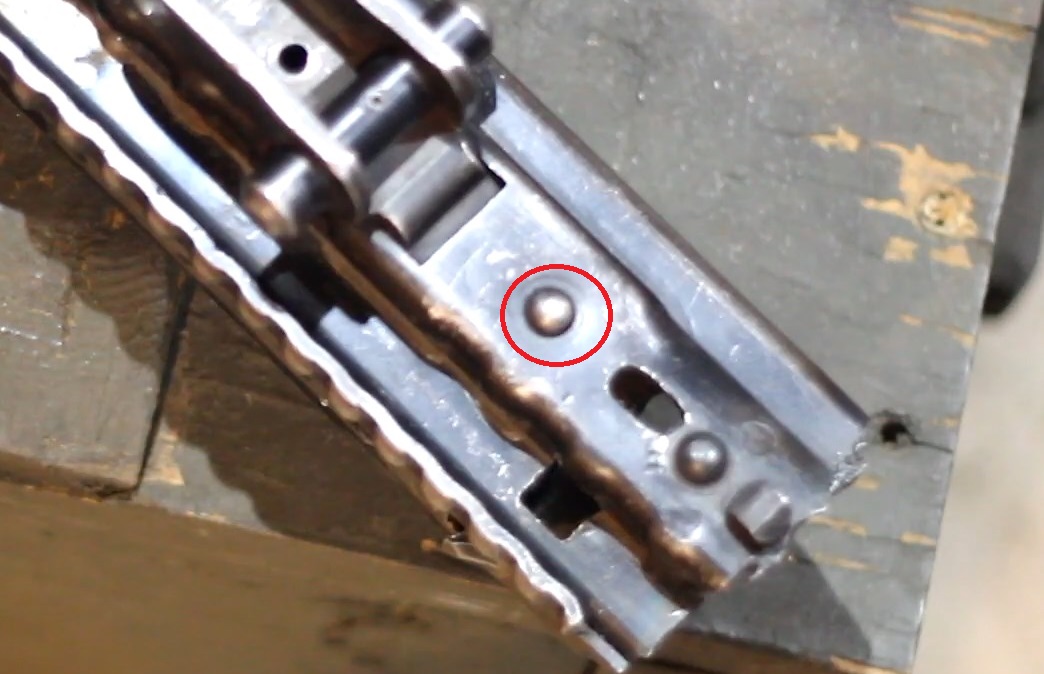
encircled rivet holds the tongue in place, you can see where it enters in to the receiver from the mounting bracket
Once we have the mid section aligned, we can go ahead and complete our semi auto mods. The first mod we will need to do is weld in the blocking bar. The blocking bar has to be welded under the pistol grip mounting bracket, so the first step is to remove it. The bracket is retained by three rivets, two are large and cut flush inside the bracket itself. The bracket on the MG42 / M53 is integrated with the recuperator backing tongue, basically, the recuperator backs up against the tongue and it acts as a stopping bracket for the recuperator. The problem is the tongue is installed before the integral rails, and it cannot rotate out without the rails being removed. Because I do not want to replace my rails, I have opted to instead cut the tongue off of the mounting bracket. The tongue is then only retained by a rivet under the receiver. if you cut and drill that rivet out after separating the tongue from the bracket, you can then successfully remove it from the receiver.
Next you will need to remove the pistol grip mounting bracket. You should be able to see two circular spots on the bracket and you’ll want to drill those out. Once the rivets are loose and drilled through, the bracket simply pops off.

mounting bracket removed and blocking bar channel cut
At this point, your receiver is ready to be cut and the blocking bar ready to install. If you set the blocking bar on top of the receiver butting against the back of the pistol grip cutout hole, you’ll see the full extent of where the bar needs to sit. You’ll want the blocking bar to be inserted center to that section. To find the center, you can measure out the diameter of the pistol grip cutout hole using calipers, find the center of that cutout by dividing that measurement in two and then scribe the center of the cutout on the receiver. next, measure the blocking bar thickness, divide that number by two, and you can then inscribe right and left of your center scribe to get the full cutout width. You can use a straight edge to then scribe down the length of the receiver for the full cut out. You will basically be cutting it all the way through to the rear cutout where the tongue inserts through the receiver. You can then proceed to cut that out with a dremel cutoff wheel or your choice of cutting instrument.

cleaning welds on the blocking bar
Once the blocking bar cutout has been completed, you can slide the blocking bar into place and weld it down. Before welding, make sure the semi-auto bolt carrier slides freely in the receiver and clears the bar without any issues, and also confirm that the bar properly blocks the full auto bolt carrier from being inserted into the receiver. You’ll want to weld down the entire length of the bar on both sides till it’s permanently in place. Once your welding is complete, you’ll need to grind the welds flat as you’ll need to get the grip stick retaining mount flush on the receiver. In my build video I made the mistake of re-aligning the grip stick mount with the original grip stick. After aligning the mounting bracket with the grip stick, I welded the mounting bracket fully into place. The problem with this was that the semi automatic grip stick didn’t align perfectly in the same position the original did. This made fitting a little harder and the channel that I needed to cut to allow insertion of the grip was slightly off center. In the end it still worked but I would advise not to permanently install the grip stick at this point. On the second build, I installed the mounting bracket after fitting the semi auto grip stick, and was able to keep it perfectly aligned before welding it down into place.

fully extended pistol grip cutout
After the blocking bar is installed, you will want to extend the cutout for the pistol grip so that it will not allow the installation of the original full auto grip stick. This will also give clearance for the hammer and the hammer spring on the semi-auto grip stick. This is a fairly easy cut that just extends forward following the shape and width of the original cut. You’ll also be cutting the ejection port back some to allow the semi auto grip stick to install into the rifle. The material left between the grip stick cut, and the ejection port cut can start to become thin, so it’s a good idea to try and cut the fire control group hole just far enough to give clearance for the hammer spring in order to keep as much original material there as possible for added strength. You can then cut just a notch in the front of the grip stick hole to give the hammer the full clearance it needs to travel all the way forward.

completed semi auto grip stick cutouts
Now we will need to cut the ejection port to allow the pistol grip to twist into. Since we cut the original grip stick hole out, we now have to retain the grip stick using a different method. The BRP method is to twist it in through the ejection port and have it retain at the end of the ejection port. In order to get the front grip tabs through the ejection port cutout, a portion of the ejection port needs to be cut out in a circular shape. I placed this cutout roughly half an inch from the back of the ejection port, it’s exact location doesn’t need to be precise, you just need enough material to allow the front grip stick tabs to retain against the receiver. The half inch portion from the back of the ejection port to the circular cutout needs to be widened as well to accommodate for the width of the portion right under the grip stick tabs. Once this is widened, you should be able to insert a tab into one end of the circle, put the second tab in through the ejection port, then rotate the grip so that it is aligned with the grip stick cutout hole. The grip stick can then be pushed backwards.
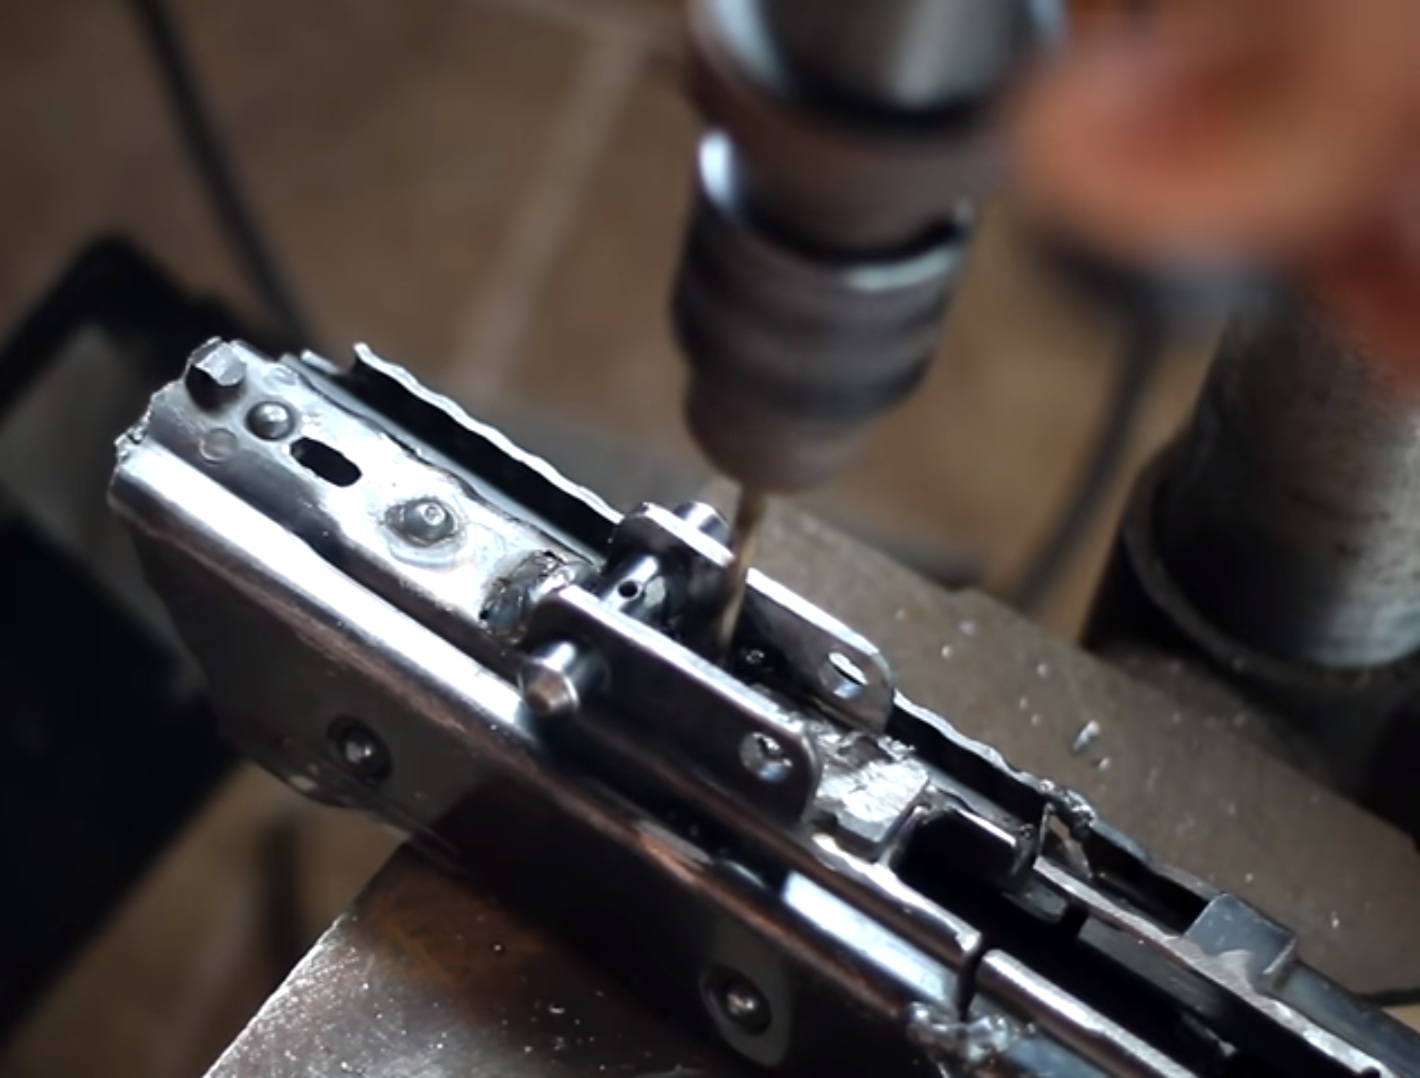
drilling recuperator retaining hole
At this point, I would recommend putting the grip stick mounting bracket onto the bottom of the receiver and then tack weld it into place where it is best aligned to allow the semi-auto grip stick to install and remove with ease. Now, when we made the cutout for the blocking bar, you’ll remember we had to cut out the hole for the screw that retains in the recuperator in the rear. Once the grip stick mount is welded in place, you can see where the hole should be as it is present on the mounting bracket. At this point, you can proceed to drill out the section on the blocking bar for this screw hole.

recup cut diagram
In order to weld in the tongue, we need to first install the recuperator so we know exactly where the tongue needs to be to keep it backed up against the recuperator. In order to insert the recuperator, it needs to be modified to allow clearance for the blocking bar. The recuperator will also need to be cut to allow clearance for one of the semi auto pistol grip tabs. The BRP semi auto blocking bar has two bars, and as such, the recuperator needs to be cut in two places for clearance of those bars. The rear has to be cut back almost to the retainment hole, and then a rectangle can be cutout on the front section to clear the second bar. You basically just need to cut it out to look like the picture. According to the BRP diagrams for the cuts, the most forward cut is 7.7″ forward and is one inch long. Re-inserting the recuperator with the blocking bar can be a pain in the ass, you have to first insert the forward screw through the hole and basically push it in while trying to keep the recuperator rotated upwards at an angle. You will then press the screw in as far as you can with it rotated upwards and then rotate the recuperator downwards over the blocking bar.

Welded in back plate
Once you have the recuperator installed, you can install the tongue in through the cutout on the bottom of the receiver. Once you have it aligned well with the recuperator and it’s butting against the back of the recuperator properly, you can proceed to weld the tongue in place from the bottom of the receiver and connect that weld with the pistol grip mounting bracket. Once this is complete, I recommend testing fitment of all the parts, including the bolt, carrier, and pistol grip. The semi automatic bolt has to be installed first before the grip stick. Once you have the bolt carrier inserted and forward enough to allow clearance for the hammer, you can install the grip stick and pin it in place. Make sure everything moves back and operates smoothly.

Left is top trunnion stop, right is the bottom trunnion stop
The next step will be to weld on the shroud to the receiver section. I recommend keeping the recuperator in place for this so you can make sure it works properly with the barrel, it will help you determine if there is any binding and you can make sure the barrel is moving back and forth against the recuperator with it installed. The first step in getting the shroud aligned is to install the camming block / trunnion. For simplicity, I will just call this part the trunnion. This is pretty straight forward, just line it up with the cutouts on the receiver and you should see where the trunnion stops are. Once you get it installed, slide on the right trunnion section and then you can slide the shroud into the camming section. At this point you’ll see the bottom is pretty well aligned but the top can be difficult to keep straight. This section can be pretty frustrating and can take some time to get perfect, but the best way I’ve found is to do some taking and cutting to get everything aligned.

Top tack welded in place
I’ll first put some tacks on the top of the receiver, just approximating where it should sit based on how well the trunnion cutout holes are aligned with the trunnion, we want to make sure the bottom is flush and straight for the next step. After tack welding the top, I will remove the trunnion and tack weld the bottom and then grind them flush since these cuts are under the trunnion itself. At this point you can reinstall the trunnion and cut the top tack welds. The reason we did this is because we can’t weld the bottom of the receiver with the trunnion in place, but the trunnion is what helps us keep the alignment of the receiver sections. We want to be able to pivot the shroud up and down with the bottom tacked in place. To keep the sections aligned with the trunnion removed to tack weld the bottom, we first tack the top with the trunnion installed, the top tacks will maintain our alignment and then we can weld the bottom, install the trunnion, and cut the top tacks to allow the entire shroud to pivot up and down from the bottom tacks.
Once the trunnion is installed and the top tacks are cut, make sure you can install and lock the barrel, you want to make sure the trunnion is installed straight and sitting at the right angle and that your tacks didn’t throw it off any. Since the recuperator is installed, when you install the barrel you will have to give it a nice slap since the barrel has to push the recoup back a hair. Once the barrel is locked into place with the recoup pushing it forward and the barrel door closed shut and locked, you should now be able to tilt the shroud slightly up and down, and at the very front of the shroud you can see if the barrel is center or not. Get the barrel center with the shroud and then tack into place, welding will also pull the metal closer together from shrinkage so keep that in mind of course. Once you have your tacks in place, make sure the barrel can move back and forth against the recuperator and that it is properly pushing the barrel forward without resistance. If there is resistance, cut the top tacks and re-align the shroud to the barrel. Make sure the barrel can move back and forth without any problems, and then re-tack. Once it is tacked and the barrel moves back and forth against the recuperator without any problems, you should be good to go. At this point, take the trunnion off and start welding the bottom. Alternate between welding the top and the bottom doing a crisscross pattern to ensure that you have even heat distribution and you don’t pull one side too much causing misalignment. I would advise after two weld sessions, one on the top and one on the bottom, pop the barrel back in and make sure it moves back and forth smoothly. Once it is welded up, grind the bottom flush so that you can install the trunnion and everything should be good to go. At this point you can remove the recuperator from the receiver and weld up the receiver section that is open near the recuperator, if your receiver is cut in such a way that you need to weld in a place the recuperator sits.
At this point, I would move forward and weld in the front shroud. In the video, I did this before welding the shroud on to the receiver. Honestly it worked perfectly fine, but on a second build I went ahead and welded the front shroud section after welding the main shroud onto the receiver. In practice this is better as you can make sure the front shroud section is perfectly aligned with the barrel locked into place. As stated above, I opt to use one of the MG3 front sections as they have the barrel bushing intact, and it makes the whole process easier to complete. Some kits may have complete front sections though, so you may be able to just use the cut section that came with your kit. The kits that I have were cut through the front barrel bushing, making the front sections useless. In this guide, I will be cutting and using the MG3 front sections that are available on the market at the time of writing this tutorial.
 There are different ways you can attach the front MG3 section. you can measure out from the end of the bushing on the MG3 section, cut, then cut your receiver to match, and weld it together. You can measure from the end of the MG3 front section, take those measurements and cut the rear shroud, and then weld the MG3 section on. It all depends on how you want to go about doing it. Personally, I opted to cut the rear M53 shroud to match the MG3 front section and weld it on. I obtained the cutting measurements utilizing tape. I got some tape, then placed one end in the center of one of the shroud holes on the MG3 front section, then let the tape follow the shroud hole to the cut, and then I cut the tape. I then overlaid that cut tape onto the M53 shroud in the same place and marked it. I then proceeded to do the same with the top of the hole, and then proceeded to do it with all the other shroud holes that circled the shroud, making marks on the original M53 shroud each time. I then connected the dots, using tape to mark between the markings I had made, and then cut the M53 shroud along those lines. The result was a perfectly cut shroud that matched the MG3 one. With that complete, I inserted the barrel and visually confirmed.

front section tacked in place
Once you have everything cut to size, you can start tack welding everything in place. With the barrel installed, try to clamp the front section around and make sure the barrel itself stays center in the front section, once everything is center, make a few tacks in various places around the shroud. Once you have everything tacked in place, remove the barrel, install the barrel bushing, re-install the barrel, and make sure that when you press down on the bushing that the barrel itself freely and easily presses inwards against the recuperator. You’ll want to make sure the recuperator can push the barrel back forward without any issues when you release on the bushing. If you have issues, your front section may not be aligned and you’ll want to cut a couple tacks and try and align it in the right direction. I found that as long as I made sure the barrel was center, I was able to tack it into place without needing to cut the tack welds to re-align anything. Once you’ve confirmed that everything is aligned correctly, start welding around the shroud, start laying down weld on one section and alternate diagonally across each place you weld, to control the heat and also to control which way the weld is pulling the receiver sections, confirm after laying down some weld that the barrel moves freely. Once you have it welded all the way around, the front section of the receiver is complete.

rear receiver section tacked on
The final piece of the puzzle is the rear section. It can be a little tricky to figure out where it needs to sit. You want the stock buffer to sit straight in the receiver, so the recoil spring aligns properly with the bolt carrier. You can fit the stock into the rear section and into the back of the receiver and find where it aligns. then wedge in pieces of metal between the gap between the receiver sections, clamp it in place, and then start taking the rear section into place. Once tacked, confirm that you can remove and install the stock without issues. You may have to cut and re-align it a couple times but it’s far easier than doing the shroud. Once again, once you have it tacked in place, alternate between the left and the right, top and the bottom while welding it in place till you weld all the way around the receiver. Once you have that complete, the receiver reweld process is complete, and you can move onto fitting all the semi auto parts to the gun.
Fitting the semi auto parts was challenging the first time I tried, the reason is because BRP did not make it clear as to how to fit their parts to your re-weld so I had to figure it out as I went along. There are a few things you’ll need to know. First, the retainment tabs on the trigger pack have too much material on the top of the tabs, especially the right tab. The bolt carriers did not clear this retainment tab on either of my builds and they had to be cut down till the carrier cleared them without an issue. This wasn’t really a hard thing to figure though because as soon as you try and stick the bolt carrier in with the grip stick in place, you’ll know right away that it will not clear that retainment tab.

modified back of the BRP bolt carrier
The second issue had to do with the hammer not clearing the bolt carrier cutout. When the bolt carrier was fully locked into the barrel, the cutout on the carriers seem to have too much material in the rear, after cutting it some, I found the hammer was then able to clear it fine, but I started having light primer strikes due to the hammer still catching slightly on the back and then falling forward, so I had to cut it back even further and I made sure there was plenty of room for the hammer to clear the carrier the second time I cut the carrier for the hammer. I assume BRP left this long for you to fit to your individual gun, but there was nothing in their build docs that specified that.
Finally, the firing pin is long on both the front and on the back of the pin. On the first build I did, while firing the gun, the back of the firing pin started to mushroom pretty badly, to the point where you couldn’t remove the pin from the bolt carrier due to the back of the pin being wider than the firing pin hole. During my test fires, the firing pin was also piercing my primers. Both of these issues stemmed from the firing pin being too long on both ends. They were meant to be modified by the end user to fit their gun. The idea is to trim the back of the firing pin so that the hammer hits it perfectly at a 90 degree angle. The front of the firing pin, when fully protruding out of the bolt, needs to be shaved down with a file till the protrusion is about 0.07″ in length. The original protrusion on my firing pin was 0.12″, and after shaving it down, those issues were solved. The final problem I had was primer material sucking back into the bolt itself, that ended up being an issue with how deep the firing pin sat in the head. This was something that BRP had in their documentation so it was easy to diagnose and fix. The firing pin needs to sit about 0.02″ when retracted into the bolt, and this depth can be set by using timing washers that sit on the back of the firing pin shoulder. Using the provided washers in the BRP kit, I was able to set the depth to the correct location. You can read their documentation on how to time your bolt here
And folks, that’s really all there is to it. It’s not really a hard build, but it is tedious and time consuming. Needless to say, with all this knowledge under my belt, the second time around was a lot easier than the first time around, and I hope that if this is your first time building an MG42 / MG3 / M53, that this information will help you save a lot of time, money, and frustration in this build.
I’ll leave you all with this final video of the gun in action, just to prove I’m not lying that that this thing does actually work!


Great instructions. I built on using a cold steel solutions receiver……. big mistake…..
Why was it such a big mistake? I can’t find any cut receivers and likely have to use a cold steel receiver.
Hi Dak,
The length was great and it gave me a lot of metal upfront as my front receiver shroud was cut short, but there was a lot of warping of the metal. So much work to try to get the bolt to ride smoothly. If I could do it all over again I would have gone with the global Machining mg42 receiver blank
Where did you purchase the kits from?
Gunbroker
Hey there I’ve been looking for a while to find out what the pin is called an the back of the grip mount attachment. The forward pin/screw that actually hold the grip assembly in place I have, but not the rear. Nor do I know what purpose it serves any info would be very much appreciated
Hello, I emailed the atf asking about the legalities of making a semi auto m53 and the only thing they told me was to make sure it’s 922r compliant. I was wondering what you had to do to keep it 922r compliant?