Go Green! Shooting with Night Vision
While night vision equipment isn’t truly a necessity for the majority of civilian shooters, having your own set of NODs is a huge force multiplier when needed and, let’s face it – it’s just fun to go green, especially when you’ve got friends to do it with. Now that many big shooting schools are offering NOD curriculum and night vision-focused retailers are popping up everywhere, the shooting world seems to have embraced the green screen.
Please keep in mind I’m writing this from the perspective of a civilian end-user, for those who may be unfamiliar with night vision basics – there are a bunch of subject matter experts out there who can provide a deeper level of knowledge and training, and I advise you to seek them out if you want to go farther down the rabbit hole!

Plunging into a night vision setup, even with purchasing most equipment secondhand, is a significant investment. While there are many optional items that enhance the experience of shooting under night vision, there are three primary components needed:
1.) Night Observation Device (NOD)
2.) Headgear / Mounting System (helmet/cap, shroud, mount, )
3.) Aiming System (properly configured red dot and/or Multi-Function Aiming Laser [MFAL])
These items are the bare minimum for being able to move and shoot while wearing night vision.
NOD
The key component of the Green Eye Trinity is the night vision unit itself – Most will refer to their unit as NODs regardless of how many image intensifier (I2) tubes they actually have. For all of us in the Civilian World, NODs usually fall into one of two categories – single-tubes or dual-tubes. For the purposes of the article, we’ll avoid going in-depth on tube generation and quality.

Single-tube NODs typically consist of PVS-7 goggles, PVS-14 monoculars, or any of the number of civilian units or Russian derivatives at the low end. These are the most cost-effective NOD setups and, provided the right tube is used, can still provide the user with an extremely clear image even in the darkest of conditions. While it is more than possible to train to be effective shooters with these kinds of units, the lack of depth perception can cause problems for casual end-users when it comes to things like movement or driving.

Dual-tube NODs are less common, but quickly gaining traction – popular units include the Sentinel, DTNVG, ANVIS series, BNVD and PVS-15. Having two intensifiers solves the depth perception issue that plagues single-tube users, but the field of view remains the same – 40°. The benefits, however, are significant – it is much easier to move around on foot and drive vehicles than with a single-tube device. The main trade off is cost: dual-tube NODs can range anywhere from double to five times the cost of a quality single-tube unit. There are also training and technique considerations when shooting with binoculars instead of monoculars, namely: white-light transitions and handgun shooting, which must be approached differently when both eyes are covered.
I started off with a PVS-14 from Night Ops Tactical as my first NOD setup, and then upgraded to a DTNVG. I was able to use the optics and tube from my -14 in my DTNVG build, with final setup coming out to around $8500. My recommendation, 100% of the time, is to start off with a dual-tube setup if you have the means to do so. With that being said, a good quality PVS-14 – coupled with a lot of time on the range and on the trail – will be more than adequate for the typical end user, and I’m happy to recommend that route as an alternate.
HEADWEAR SYSTEM
The next major component is what you need to actually wear your NOD and be able to do things with your hands – this system consists of the headgear and shroud, and the mount arm.
The headgear itself is the base of the headwear system and can typically be broken down into two types: hard and soft. What you plan to do with your night vision influences which type you would need.

Hard headwear, specifically helmets, provide the most stability, mounting points for additional equipment (task lights, cameras, strobes, etc.) and protection from bumps and/or ballistic threats. However, in addition to being bulky, they are inherently heavier than non-protective headwear. Price is also a concern for helmets – non-ballistic models are in the $300-$500 range, while the lightest ballistic variants can be upwards of $1000.

On the other hand, soft headwear – like the Crye Nightcap or Wilcox/First Spear VAS Harness – are lighter, more packable and better ventilated than helmets. While they will get the job done in a pinch, soft headwear isn’t too optimized for anything involving rigorous or dynamic movement. These options shine when protection is not a priority, and are perfect for applications like hiking, hunting and stationary observation.
Most headwear options, both hard and soft, come with the shroud already pre-installed – this is the plate on the front of the headwear that accepts the NOD mount, the actual connection between your night vision and your headwear. There are a variety of options available on the market, including some that route power to your NODs from a remote battery pack, but for the average end user the most important thing to look out for is whether the mount you’re buying matches up with the interface on your unit. Generally, single-tube units have a bayonet interface while dual-tubes have a dovetail interface.
Personally, I keep both a Team Wendy Exfil Ballistic and a Crye Nightcap, and that combination seems to cover all my bases. I use the Exfil for the majority of my NODs time – the Nightcap only comes out for things like hiking, and as a low-weight option and backup for air travel. I use and recommend Wilcox for shrouds and mounts, as their mounts offer a lower profile and finer adjustments than Norotos offerings.
AIMING SYSTEM

LLC).
The last part of the trifecta is what you need to actually shoot (and get hits) with when shooting under night vision. Traditionally, the main method for aiming under NODs has been the multi-function aiming laser (MFAL), but high-mounted daylight optics are now catching on in the mainstream after years of popularity in the SOF community.

MFALs are the time-proven method of shooting on the green screen. From the early PEQ lasers to the latest MAWL, anybody needing to shoot under NODs has an MFAL on their front rail. True multifunction units typically include three different beams: 1.) a visible aiming laser (either green or red), 2.) an infrared aiming laser and 3.) an infrared illuminator. There is a huge assortment of laser units that offer varying capabilities, at a wide range of price points. The PEQ-15 and DBAL series are the most widely-used US-made weapon lasers currently, with the newer BE Meyers MAWL offering enhanced capability at more than double the price point.
Imported lasers like the Russian Perst and Chinese Holosun offerings are growing in popularity with the budget crowd – while they will get the job done, be sure to do your research if you choose to go the route of foreign-made. Oftentimes, switchology and mounting/zeroing procedures may differ from US-made lasers. Also keep in mind that most aftermarket accessories are typically designed to interface/work in conjunction with the DBAL, PEQ-15 and MAWL series of lasers – they may or may not be functional when used with imported lasers.
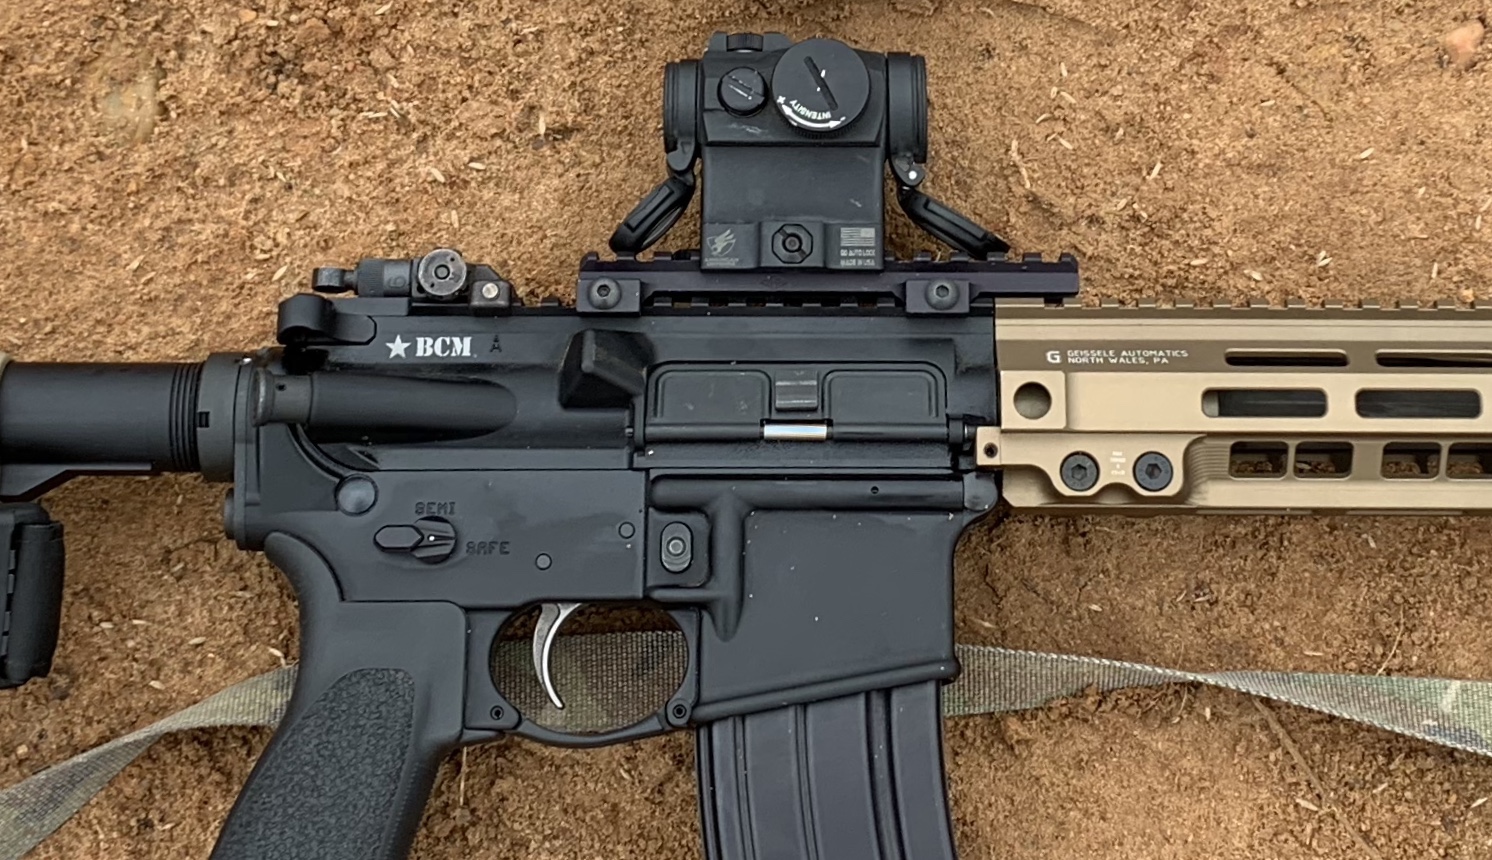
As an alternate aiming method, high-mounted optics (usually 1x systems like Aimpoints or EOTechs) have been in use by special operations assaulters for very specific nighttime applications, but the concept does provide some benefits for daylight aiming as well. Paired with a weapon-mounted IR flashlight like the Modlite IR or Surefire Vampire series, a high-mounted optic allows the shooter to engage targets under night vision exactly as they would during the day. Nighttime benefits include passive engagement (when OPFOR might also have night vision) and the ability to take longer shots without worrying about offset holds.
My rifle is setup for both methods – I currently use a civilian-legal DBAL-A3 and an Aimpoint H2 in a Unity Tactical FAST mount. Overall, I’ve been satisfied with the A3, even at its lower output levels – my only concerns are that the visible green laser is not usable during daylight hours, and the illuminator is only good out to about 80 yards. The high-mounted Aimpoint was introduced to me by a buddy, and I’ll never go back to a lower height – the daylight benefits are the big sell, but the NOD shooting benefits are a great backup to my laser and cover most of the usage situations that the DBAL doesn’t.
GO GREEN!

So, you’ve squared away the basic equipment for night vision shooting – the only logical thing to do next is to NOD up and get out there! In addition to small variances in equipment quality, everyone’s eyes are different and that really affects how your gear works for you – it’s important to know how your own organic optics work with the electronic ones. Familiarization and constant use are both key to staying proficient at moving and shooting under NODs.

For those looking for more formal instruction, many reputable instructors are now offering NODs-focused courses that range from baby-step fundamentals, to no-light CQB and patrolling. LMS Defense‘s Practical NVG curriculum, for example, teaches a blend of the basics, with some practical application thrown in to include foot movement, first aid and driving under NODs. Presscheck Consulting‘s Nightfighter course focuses on weapons manipulation and marksmanship for both rifle and handgun while wearing NVGs, with a classroom block of instruction that will teach you much of the technical information behind the night vision world – I would definitely recommend these courses if you are new to the no-light game.
For online information, I recommend the Youtube channels of Aaron Cowan at Sage Dynamics and Tactical Night Vision Company. There is a lot of good knowledge to be had on those channels, both in terms of technical aspects and actual use of NODs and related equipment.
Remember – no matter the choices you make in equipment, the most important thing is to know your gear, and what you can do with it!


